The Start - The End Of The End
So, now we know how to deal with moving from one table to the other and avoiding leaving blots wherever possible when bearing in or bearing off, let's look at the beginning of the game.
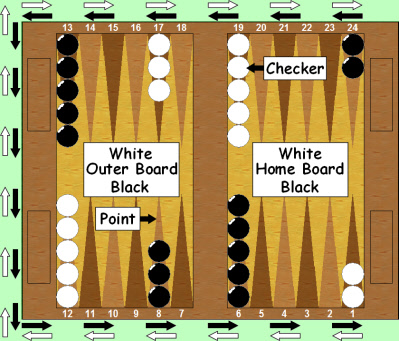
Set up your board exactly like this
Refer to the starting position above and set up your own board in the same positions for you (black) going in an anti-clockwise direction; turn the board around to view the starting position for white (you can play in either direction with both inner board tables to your left as for white). You are moving all your checkers around the board into your inner board and then bearing them all off to win - simple! The problem is, white is doing the same too - and you have to stop them. You stop white achieving this by blocking their moves by constructing primes (two or more points in a row occupied by two or more checkers of the same colour). These primes are used to contain your opponent's checkers and to restrict their movement around the board - but, as you've guessed, they are doing the same! It is this tactical blocking and escaping that makes backgammon so exciting.
You know what a blot is and that it is desirable not to leave any so the best way around the board is by making points and, if possible, joining those points into primes (two or more consecutive points owned by a player). To ‘make a point’ all you need are two or more of your checkers on the same point. If you look at the board above you’ll see you already start with four points each.
Now, let's look at the standard opening moves.
The Opening Moves
Backgammon is played with four dice. To begin a game of backgammon each player picks two dice: your opponent takes one, you take one, they take another and you take the final one. To start each player rolls one die onto the board into the table on their right-hand side, (never into the table on your left-hand side); and, as long as each die lays flat upon the playing surface (not on top of any checkers or leaning at an angle against a checker or the side of the board – referred to as ‘cocked’) the player rolling the higher die uses both dice as his opening roll. If both players roll the same number (6-6, 5-5 or any doublet) then both players roll again; this means that you never start the game with a doublet (although the 2nd move - someone's first - can be a double). To ensure a random roll each time the dice must be placed in a dice cup and shaken vigorously and then thrown from a discernable height and be seen to bounce across the board, finally coming to a halt flat on the playing surface. After this first roll, each player then continues in turn to roll both dice.
Moving checkers in backgammon isn’t as strict as in chess where the ‘touch move’ is in play. You are allowed to move any checkers you want, back and forth until you are satisfied with their final position. You then indicate the end of your turn by picking up both dice. During your turn your opponent isn’t allowed to touch or interfere with any checkers (including their own). When you have completed your turn, your opponent then shakes and rolls their dice and thus the game continues. If after picking up your dice it is noticed you made an illegal move, perhaps placing a checker on the wrong point, then your opponent has the choice of leaving the checker where it is or making you replay it correctly before they roll their own dice.
If a checker is hit during a move then it must be placed on the bar ready for re-entry. Any checkers removed in the bear-off must be removed totally from the playing surface – this is very important in tournaments; if you accidentally place a borne-off checker on the bar instead of off the board and you pick up your dice to conclude your move, the checker on the bar will remain there at your opponent’s discretion and will have to re-enter and go around the board back to your inner board before being borne-off again.
Opening moves are in three categories: Point Makers, Builders and Runners. The annotation used, 8/5 6/5, refers to moving one checker from the 8-point to the 5-point and one checker from the 6-point to the 5-point. If you are unsure where on the board these points are, using a strip of paper, number all the points on your board as shown above.
Note: It should be pointed out here that the checkers do not have to be moved in any particular order. Any checker, as long as the dice allow, can be moved. You do not have to move the checkers on the 25-point first.
Point Makers
As the name implies these rolls start out doing the very thing you set out to do, make points. Making points in backgammon is the key to stopping your opponent from getting around the board before you do. They form blocks or primes that stop or inhibit their movement and they act as safe havens for your own checkers on their journey around the board. They are (in order of preference):
|
|
|
|
|
|
| # |
|
# |
 |
|
|
|
|
|
| # |
|
# |
|
|
(a) The 5-point is the best point to hold and is called the Golden Point. This is known, when it occupies an opponent’s 5-point (your 20-point) as an advanced anchor. An anchor is a point held by an opponent in your home board. They offer safe landings for blots re-entering off the bar. Occupying your 5-point is very important – it stops your opponent making it and obtaining a safe landing spot for his own checkers coming in off the bar.
(b) The bar-point (7-point) blocks your opponent's 6s and makes it difficult to escape the back checkers (known as runners). Also they can become part of a prime later.
(c) Makes an important inner point and a block for 4s off the bar.
(d) A little too deep. It's better to keep points closer together and in descending order from the 6-point if possible, but nonetheless the 3-point is worth making with an opening 5/3.
(e) Probably too deep for a point for advanced players but acceptable for a beginner (see 6-4 Runner). However, new thinking among backgammon players is that making the 2-point isn’t as weak as first thought; thinking brought about by software programs that play the game to a very high standard
Builders
Although single checkers are blots they are also builders for points (as is any spare checker on a point, or points themselves in many cases). Builders are very important and are used to make points and construct primes; and to hit an opponent's blot if the occasion arises. Building rolls are in two categories:
|
|
|
5-4: 13/8 13/9 (a) |
|
4-3: 13/9 13/8 (a) |
| # |
|
# |
|
|
|
5-2: 13/8 13/11 (a) |
|
3-2: 13/10 13/11 (a) |
| # |
|
# |
|
|
|
2-1: 13/11 24/23 (b) |
|
4-1: 13/9 24/23 (b) |
| ## |
|
5-1: 13/8 24/23 (b) |
(a) These moves are mid-point builders (13-point) and are only vulnerable to an indirect hit (i.e. the roll of two dice is required to hit - e.g. anything greater than a 6). Although these blots might be hit the benefits are worth the risk - and backgammon is about taking calculated risks. Imagine you left a blot only 6 points away (a direct shot) from an opponent's checker; it will be hit 17 rolls out of 36, but if you leave an indirect of say 7 or 8 points away then only 6 out of 36 (maximum shots for an indirect shot) will hit. So, when considering leaving a blot/builder remember to keep well away from your opponent's checkers. Many beginners fail to see the potential of builders and often, when rolling 5-2, 4-3, 3-2, or 4-1 play them as a 7 or a 5 and move from their 13-point to 'safety' on their 6-point or 8-point. This is wrong and a complete waste of a roll.
(b) These are splitting builders or minor splits as they are known, creating builders for the outer/inner board and starting a runner (back checker) off, the runner threatening your opponent's tables with a possible direct or indirect shot. Although these splitting moves leave a blot within reach of a direct hit with 6s, 5s or 4s, your opponent is unlikely to do so for fear of being hit on re-entry and forced to restart his checker back in your home board. Splitting your back checkers makes it hard for your opponent to move his own checkers without leaving them exposed to being hit.
Runners
These are checkers played from the 24-point, your back checkers. These are:
|
|
|
6-5: 24/13 |
|
6-4: 24/14 (a) |
| # |
|
# |
|
|
|
6-3: 24/15 |
|
6-2: 24/16 |
(a) This move can also be a 2-point maker, which for a beginner is perfectly acceptable.
Modern backgammon thinking has somewhat altered these running moves in that the 6 is played 24/18 and the remaining number is moved from the mid-point, the 13-point. Although this is correct for established players beginners are advised to stick with the 'traditional' runners until their game has reached a stage where they are competent in their checker-play and are able to recover from their 18-point blots being hit. Experiment with the ‘old’ and the ‘new’ and see what difference each one makes to winning games.
Doubles
Although doubles are not technically opening rolls they can be the first roll for one player. When two or more checkers are moved at the same time via doubles, they are shown as 24/13(2), the (2) denoting two checkers moved. These (if possible) are the standard opening moves for a beginner:
|
|
|
6-6: 24/13(2) |
|
5-5: 13/3(2) |
| # |
|
# |
|
|
|
4-4: 13/5(2) (a) |
|
3-3: 8/5(2) 6/3(2) (b) |
| # |
|
# |
|
|
|
2-2: 13/11(2) 6/4(2) (c) |
|
1-1: 8/7(2) 6/5(2) |
(a) Alternative 4-4 moves are moving the back checkers 24/20(2) to make the Golden Point and 13/9(2) with the remaining two 4s; or 24/20(2) and 8/4(2) making the (rather deep) 2-point. Generally, if your opponent has made a home board point on his first move other than his 5-point then playing 24/20(2) is the better move for two of the 4s.
(b) Alternative 3-3 moves are making the bar-point in either table by playing 13/7(2) or 24/18(2); or any combination moving 24/21(2) and any other legal move.
(c) Sometimes 2-2 is played as a Golden Point maker by playing 24/20(2). This is the case when your opponent is threatening to make (or has made) his bar-point (7-point); or is threatening to make his 5-point on his next roll.
Exercise 6: Set up the board and practice moving all the opening moves, including doubles until you are adept at making the standard opening moves to such an extent that you don't have to think what to do but do so instinctively. Don't rush this step; take the time to learn them for the moves themselves can often be applied at times other than the opening move. Convince yourself about the builders and the probability of their being hit. Many ‘established’ players are not familiar with the opening moves and often misplay them – don’t become one of them. One very important point to remember is that you have two dice and can therefore move two checkers – all too often beginners make the mistake of adding together 5&2 and 4&3 and playing them as seven, moving 13/6. Likewise with 4&1 and 5&2 being played as a five, 13/8.
Time To Play A Game
When you have mastered the opening moves it's time to play a game! This time you are on your own, remember, try to move safely and use (safe) builders to make points and primes as you progress towards the bear-off and the finish. Keep well away from direct shots and leave as little as possible for your opponent to hit but at the same time remain flexible. Try to have a strategy in mind and be prepared to abandon it when things don't go the way you anticipated; always have a back-up plan!
Using these guidelines you will soon become addicted to the exciting game of backgammon - and then you'll need to study a few books to improve your game. That's when you'll need to know what to do with the doubling cube - the large 'die' with the numbers, 2, 4, 8, 16, 32, and 64 on it. But, until you master the art of moving, priming, and bearing off the doubling cube will have to wait.
To help you gain a better understanding of the probabilities of the dice rolls and make better judgments about checker play, click on the link below to Part III where you will find essential tables for winning at backgammon.
How to...Part 1
How to...Part 3
|


